Wednesday, July 20, 2011

A Perfectly Pink Party! Part 3 (the end!)

I promise that this is the last installment of the Perfectly Pink Party posts!  I didn't realize that there was so much info to cover when I started writing the 1st post - it kept going and going just like the Energizer bunny, who happens to be pink too:)

So the only details left to cover are the food and drinks - unless I have forgotten something, which is quite possible since I seem to be absent minded lately.

Food!  Such an important part of any party, but over the years we have wasted a ridiculous amount of it.  I'm talking whole pizzas, sandwich trays that were never uncovered, and enough snack mix to last for at least 3 months.  So I have learned that less is more when dealing with kids because the excitement of the party usually seems to override their desire to eat (until the cake is served and/or once they get home later).  How many times have you been to a party where there was TONS of food yet when you get home your children are starving?  Kids just don't seem to understand or appreciate the value of good party food!

I don't know that I have ever hosted a party without serving a nugget tray from Chick-fil-a.  It's fast and reasonably priced, and the kids ALWAYS devour every last nugget.  In addition to the nugget tray I made pb&j sandwiches with strawberry jelly to keep with the "pink" theme and we served a fruit bowl with watermelon, grapes and blueberries.  I also filled cute little pink treat boxes with popcorn for the kids to munch on.  And that was it for the food (aside from cake of course).  Basic yet filling and kid friendly!

For drinks we served pink lemonade and strawberry milk.  I gotta tell ya, I was heartbroken that I couldn't afford to serve the drinks in those adorable little milk bottles with pretty striped straws that I keep seeing, but it just wasn't in the budget and I'm not sure that glass bottles are all that practical for 3 year olds anyway, so I sucked it up and served the drinks in pink paper cups with plain old white straws.  Finding plain white bendy straws was a chore though!  It seems that most straws these days have colored stripes on them and that just wasn't going to work with the pink theme I had going.  Some people call this being obsessive but I call it being detail oriented.  So after searching high and low I finally remembered that the kid's straws at Chick-fil-a are not only bendy but also plain white and I grabbed a handful from the lobby and put an end to that debacle.  Not only were they just what I had been looking for but they were free!

Cute treat boxes from Wal-Mart were made even cuter with circle tags that read "Addyson loves Pink".
 The white drink bucket from Target held small plastic bottles of pink lemonade.

Chicken nugget tray, pb&j sandwiches and a fruit bowl along with drinks and popcorn to munch on.
And now on to the really good part!  My favorite part of any birthday party - THE CAKE!  And cupcakes in this case.
Once again the budget kept me from ordering the usual amazing cake from Edible Art which saddened me, but I was pleased with what I was able to do on my own.  I knew from the start that I would be making cupcakes and I also knew that for the first time ever I was going to make homemade buttercream frosting (so glad I did!)  But a few weeks before the party I started to feel guilty that Addyson wasn't going to have her own cake, so I purchased the Big Top silicone cupcake pan (on sale at Toys R Us for only $12.99) and decided to make a giant cupcake for the cake.  She was soooo excited, but I was nervous that I was going to somehow ruin it.  I'm happy to say that I did not ruin the cake and that my buttercream frosting was delicious!


The homemade cake and cupcakes complete with homemade buttercream frosting!

The decorating wasn't perfect but it was my first attempt so I was pleased.
The party circles added a fun touch to the cake.

Buttercream Frosting recipe (adapted from Wilton)
1 cup (2 sticks) butter or margarine softened
4 cups sifted confectioners' sugar
2 tablespoons mile
1 teaspoon vanilla extract
Cream butter and shortening with electric mixer.  Add vanilla.  Gradually add sugar beating on medium speed.  When all sugar has been mixed add milk and continue to beat on medium speed until light and fluffy.
One last party detail that is food related!  I have been dying to create a dessert table a la Amy Atlas for a very long time but (yet again) I knew that such a table would eat up (no pun intended) my entire budget, so I adapted the idea to create a small "Take Home Treat" table.  This was another party favor for the guests to take home.  Everyone received a pink favor bag and guests were encouraged to fill their bag with pink marshmallows, pink wafer cookies, strawberry milkshake flavored Whoppers (who knew such a thing existed?), Oreos with pink filling and tiny boxes of pink Nerds candy.  I had such grand plans for this table including paper cones filled with pink cotton candy, pink cake pops, marshmallows on a stick decorated with pink sprinkles, pink jello jigglers, pretzel rods dipped in pink candy melts, and so much more, but there was no way to make it all happen, so once again I had to minimize.

My dinky version of a dessert table - the Take Home Treat table.

An Amy Atlas feature dessert table!
So that should pretty much cover the Perfectly Pink Party!  I would like to mention that party planning on a tight budget is challenging but it can be done with some patience and a lot of effort.  Almost everything that I bought was from Wal-Mart, Target, the Dollar Tree and Hobby Lobby, with the exception of a few small items.  The pink party circles that were used as cupcake toppers, Thank You tags on the butterfly nets, and on the popcorn treat boxes were only $10 and came from a great little Etsy shop called Paper and Pigtails.  Party printables are everywhere these days and it is a very inexpensive and creative way to customize your party.

I would also like to mention that while I do get most of my ideas from the internet I adapt them to suit my taste, style and budget.  I spend hours upon hours searching for party inspiration and ideas, then I take my favorites from various sites and combine and tweak them to create a special event that has some of my own touches along with many borrowed ideas.  Here are a few of the sites that I checked out when planning this party:

Amy Atlas
Hostess with the Mostess
Bella Grace
The TomKat Studio

Thursday, July 14, 2011

A Perfectly Pink Party! Part 2

Just in case you didn't get enough pink in part 1 of this post here's another dose for you!

First of all let me backtrack for just a moment to a very important aspect of any party - the invitation.
Since I was on such a tight budget I had to go with an Evite invitation for this party.  I found a template that was very simple and most importantly, pink, and I tried to make it cute with some fun wording.  It read as follows:
We're tickled pink and happy to say that it's time celebrate Addyson's 3rd birthday!

Maybe not the world's best invitation but it got the point across and it was free.  Gone are the days of spending money on expensive customized invitations that coordinate perfectly with the party theme.  Even though this party was very small and the guests had already been notified of the date via e-mail or in person, I still wanted to create some sort of invitation as a reminder to the guests and also to have as a keepsake.

Okay, on to the (more) fun stuff!  First up is the dining room tablescape and decor.  The tissue pom poms (love those things!) made yet another appearance dangling from the chandelier above the table, but this time I added some homemade paper chains that I made using pink/white striped scrapbook paper.  I borrowed the idea of combining these 2 elements from a great blog that I started following but my presentation wasn't quite as grand as the one that I was attempting to duplicate.  The chandelier above our table just wasn't big enough to support a huge display so I had to scale it down a bit and work with what I had.  I was pleased with the end result but was still yearning for more space to create something larger.  Oh well - sometimes you just have to settle and move on!


This image from www.snowybliss.blogspot.com was the inspiration for my tissue pom/paper chain combo above the dining room table.

My version was MUCH smaller and not quite as interesting but it's all I could do with the space that I had to work with.
And that brings us to the tablescape.  I love the idea of using wrapping paper to create an inexpensive runner for the table  (I used this idea for Rylee's party back in January too) and it was a great way to add another shade of pink to the table.  So I started with a plastic table cover from the Dollar Tree and then layered a piece of wrapping paper (also from the Dollar Tree) over the cover.  I used square plates from Wal-Mart and again used 2 shades of pink - the larger plates on the bottom were a pale pink while the smaller ones on top were a brighter shade.  I wrapped plastic utensils in pink napkins and secured them with pink ribbon.  To add another element of interest to the table I used ribbons in various widths with several patterns and textures.  I ran them across the width of the table in 2 clusters and secured them with tape so that the kids couldn't pull them off easily.  I also tied tulle bows in 2 shades of pink to the back of each chair adding another feminine and pretty touch to the room.

Ribbon in various width and patterns added interest to the solid colored table cover and runner.

The table and chandelier decor featured multiple shades of pink in several patterns keeping the monochromatic scheme from being too boring.


Since there were only a few children in attendance and most of them were around age 3 I didn't feel that we needed a lot of games or activities so I kept it simple and did 1 quick game.  I found pink (and a few green for the boys) butterfly nets at Target's dollar spot several months before the party and even though I had no idea what I would use them for at that time, I knew that they would come in handy at some point so I grabbed 10 of them.  Later when searching blogs and party sites for ideas I came across a fun party game similar to the popular kid's game Elefun.  This one was using tissue paper "butterflies" and nets just like the ones I had purchased.  It was such an easy and inexpensive game and the party guests took home their butterfly nets as a party favor.  We have an entry way with a very high ceiling in our home and a small landing at the top of our stairs that overlooks the entry way, so I stood up there and tossed the tissue paper butterflies over the railing while the kids tried to catch them in their nets.  The game was a hit!

Butterfly nets from the Dollar Spot at Target were used to play a game and also sent home with guests as a party favor.  I used pink ribbon to tie "Thank You" tags onto each net.

The Birthday Girl trying to catch tissue paper butterflies with her net.
I still have more pinkatastic birthday fun to share but this post seems to be running a bit long so I'm going to add a 3rd installment later.  Be sure to check back for the details on the food and drinks, including the homemade cake and buttercream frosting!  Yuuuummmm!


Tuesday, July 12, 2011

A Perfectly Pink Party! Part 1

I can't believe that Addyson's birthday party was almost a month ago!  Where does the time go?  


Maybe I'm having a hard time grasping the fact that the party was over 3 weeks ago because a lot of the decorations are still gracing my living and dining rooms.  This is partially due to laziness and partially due to the fact that we were out of town for 8 days.  But mainly due to the fact that I just haven't had a lot of time to remove and store the decorations, and also because the remnants of the pinkest party ever really aren't bothering me at all.  I put a lot of time and effort into making most of the decorations myself so I'm still enjoying the fruits of my labor.  We don't have guests that often so I haven't had to worry about explaining to anyone why my house still looks like a Pepto Bismol factory exploded in it but I suppose it's finally time to say good-bye to the pinkalicious decor.


As I mentioned, I made most of the decorations myself so I will be posting DIY instructions with photos and other info but first here's a brief rundown on the party:
Awhile back I asked Addyson what type of party she would like to have and her emphatic response was simply - "PINK!"  I continued to ask her over the next few months and occasionally I would get a silly answer like "dinosaurs" along with a grin but most times her response was the same.  She was so excited to have her very own pink party and she loved looking at pictures on the internet with me.  I decided to keep it a simple theme and just go with "Perfectly Pink".  No princesses, fairies, or other characters - just pink!  And that's just how Addyson wanted it too.

As always when party planning I had more ideas than I could possibly use, and my initial plan was bigger than my budget so I knew that I was going to have to do almost everything myself.  I've actually started to enjoy the DIY projects that are involved in party planning and I've become quite crafty if I do say so myself.


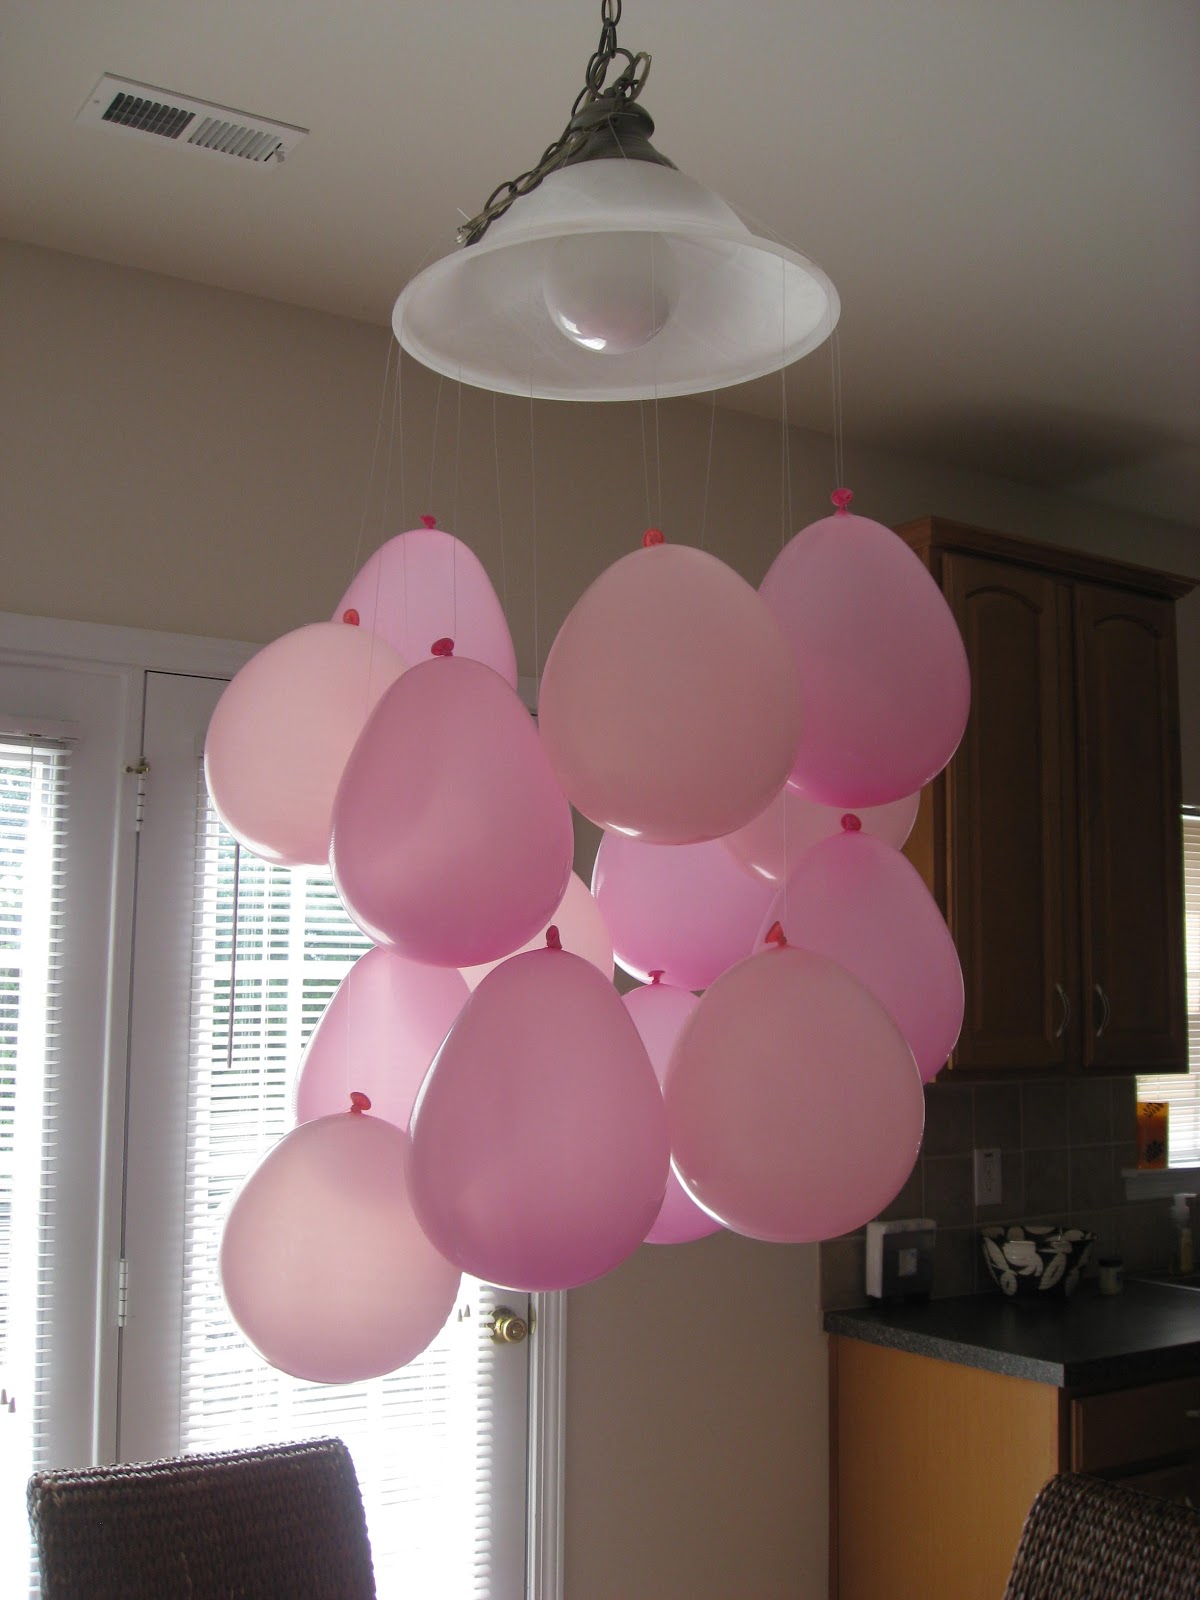
So with the theme/color scheme set all I really had to do was be on the lookout for pink stuff!  I made the famous tissue pom poms in 2 shades of pink and various sizes and used pink/white striped scrapbook paper to make paper chains (such a nostalgic and easy project).  I also bought chip board letters to spell the word P-I-N-K and I painted them and then used my handy dandy glue gun to attached them to pink ribbon embellished with rhinestones to create a banner (in case anyone didn't notice that the theme was pink this spelled it out for them).  I also cut the number 3 from some cardboard that I found in our garage and then used more pink tissue paper to cover it.  I bought tons of pink balloons and made a balloon chandelier to hang above the kitchen table.  I had also planned to make a balloon banner but ran out of time and energy.  That is a very cool project though that I will use one of these days!

The fireplace mantel/niche was home to tissue pom poms, a PINK banner and tissue paper 3.

Number 3 made from cardboard and LOTS of tissue paper!

Chandelier made with 2 shades of pink balloons and fishing wire.

All of these things were easy, inexpensive and fun to make!  Tissue paper and balloons can be found just about anywhere in any color and there is so much you can do with them!  Fishing wire comes in handy for a lot of DIY projects too.

Stay tuned for Part 2 of the Perfectly Pink Party!  I'll be posting details and photos of the dining room table and decor along with the food and drinks soon.


Monday, June 20, 2011

June Designer Spotlight

I realize that I am a little behind on this month's designer spotlight, but between Rylee's preschool graduation and planning for Addyson's birthday party and Father's Day, the time has really gotten away from me.  Not to mention the fact that our computer has been moving in super slow motion lately and I am not a patient person, so I become overly irritated and that hinders my writing abilities just a bit.

But here it is - the designer spotlight for June!  Something for the boys this time!


Da Lil Guys is a division of Nayetal, the maker of Baby Nay (one of my fave girl lines!).  Da Lil Guys is described as edgy streetwear for "lil guys" and the fun graphics add just the right touch of boyish style.

Here's my Lil Guy wearing our favorite piece!  Too bad it doesn't fit anymore:(


Wednesday, June 8, 2011

Falling Behind

Ugh!  I am in a bit of a slump.  Feeling like I have so much to do and not near enough time to do it all and do it well.  Where is the time going???


First of all, I cannot believe that the end of the school year is here and that my first born just graduated from preschool!  I just can't fathom how that happened so fast.  It's just insane.  But to celebrate we had a very small, informal get together with just a few close friends from school here at our house.  I tried to keep it very simple, therefore making it less time consuming and less costly, and I think I did a pretty good job of not overwhelming myself.  Usually when I plan a party I plan it big regardless of how many people will be in attendance.  I just can't do something half way, but I tried to scale things down a bit this time.  And fun was had by all!

So now with that little shindig behind us we are on to the last week of school for both girls.  That means teacher gifts, cards, thank you's, etc. and even though we contribute to the class gift funds I also like to do something small for the teachers so that the girls have something to give them on their last day.  I also write a personal thank you note to each teacher and I try to make sure that I am there on the last day to snap a photo of the kids with their teachers.  So with 2 kids in school and 4 teachers plus 2 administrators to give thanks to this week has been full of end of school year "stuff".  It's almost over!

When all of that is behind us we move on to A's 3rd birthday party, which is the day before Father's Day, so next weekend is going to be a busy one too!  I have so many ideas for both of these days that I almost can't keep them all straight.  Her party is going to be "Perfectly Pink" but as much as I am looking forward to it I am also stressing a bit because I feel like the party planning process is moving in slow motion.  I have a mile long list of things to do and most of those things are DIY projects that I haven't even started on yet.  And since we don't have a lot of extra money for grown-up gifts lately I also have to go the DIY route for Father's Day.  That makes for a lot of work for one momma.  


So for the next week I will be "Do-It-Myselfing" an awful lot.  In the end it will be worth all of my time and efforts but for now my head is spinning and I need to get caught up and organize my thoughts.  

Stay tuned for photos from all of my DIY projects and the pinkest party you've ever seen.

Wednesday, May 25, 2011

A New Way to Waste Time

Well, I have a new obsession time waster to share with everyone.  As if Facebook and e-mail weren't enough, now I have discovered Pinterest.  I'm totally getting sucked in, big time!  

What is Pinterest you ask?  It is a virtual pinboard where you can create photo collections of things you love, and it is quite fun.  You can "pin" photos from the web onto your boards and store them here. To get started you need to request an invitation but once you have been invited to join you can follow other members and vice versa, which makes it even more fun, because not only are you sharing your ideas but you have access to thousands of other pinboards where you can find inspiration for anything from party planning to home decor to fashion and beyond.

I'm just getting started on my Pinterest boards and I'm still perfecting the art of "pinning" but I can already tell that it's going to become one of my new favorite things to do.  What did we ever do before we had computers?

Monday, May 9, 2011

May Designer Spotlight

Okay, this might be my all time favorite children's clothing brand and I have to be honest - I almost don't want to share it with you.  It's such a little gem and I love, love, love the uniqueness of  their designs and I have never, ever seen another little girl wearing anything from this designer, so I almost feel like it's just for me my kids.  Believe me, I know that sounds silly because you can Google anything these days and it's out there for anyone and everyone to access, but this brand isn't available in any local stores (that I'm aware of anyway and I've searched high and low) and not that many people even know about it.

Sooooooo, here comes my secret: Misha Lulu.  There, I said it.  Even the name is fun!  I can't tell you how much I love this brand - the name, the designs, the fabrics, the quality, all of it!   


Misha Lulu is a family owned and operated business run by Joe and Karen Salazar, a husband and wife team located in California.  As stated on their website - "Inspired by their faith, Latin culture and childhood memories, Misha Lulu is a Retro-modern infant and toddler brand."  Retro-modern is the perfect way to describe this brand!


Some of my favorite pieces that my girls have worn were Misha Lulu and a select few have been tucked away in my "Keep Forever" bins because they are simply too amazing to part with.  I can't get enough Misha Lulu!


Paris inspired dress from the Spring 2011 collection!